From dainty serving accessories to unique planter ideas, there is so much you can tap into to wow your guests. You don’t have to buy expensive decorations to get your home ready for your next barbeque party, when you can use whatever IKEA products you already have at home.
You can even make something unique from items bought cheaply, from great outdoor items to those that work great both indoors and outside. Here, you will find some of the most inventive ideas for an impressive barbecue party, so read on…
1. Gold and marble bar cart for your drinks
Many homes have a utility cart, because it can be quite handy for storing random objects. A good cart will be sturdy and have ample space for your items. If you own an IKEA BYGEL utility cart, you can transform it into a chic bar cart that will not only be great for everyday use, but also for any kind of party you might host, whether a barbecue or something else.
For this hack, you’ll need an IKEA BYGEL utility cart, metallic gold spray paint, white primer general purpose spray paint, grey marble contact paper, a knife and scissors. First, you will need to assemble the cart, but without the shelves and the wheels. However, if the cart is already fully assembled, take out the wheels and shelves, as this well then allow you to prime and paint it.
You should make a start on this project a few days before your party, because after coating the cart with primer, you’ll have to wait at least 24 hours before adding a coat of paint. After waiting roughly four hours, you can touch up the paint if needed.
Next, you’ll need to place the contact paper on the top of the shelves. To do this, you can place the contact paper on the floor facing down and then place the shelf face on top of it. Trace and then use your scissors to cut out the traced portion. Once that’s done, peel back the paper, making sure to smooth out any bubbles as you go. Then, you can use the knife to take care of any rough edges.
Once you are finished with the shelves, it is time to put the cart back together. Make sure it is sturdy and if needed, don’t hesitate to screw the shelves in place using a drill. That’s it! You can style your chic bar cart however you like, with glassware, wine bottles, flower vases, candles, tassel garlands and whatever else works for you.
2. Multifunction cool cold serving platform
Even when serving hot chicken, corn, burgers and all that yummy food, you may also want to provide a cold foods buffet. This hack provides an option other than the fridge to keep your cold foods at the desired temperature. For this, you need cooler packs, a SPONTAN magnetic board, and felt pads for leg protectors.
First, you’ll want to add felt pad sticker onto the corners underneath the board to protect your table-top. They will also come in handy if you ever intend to use the board on the wall. Next, you’ll want to place frozen cooler bags on the table, so that they cover a smaller area than the board.
Once the board has been placed on top of the cooler packs, be sure to check that they are not sticking out. Six cooler packs will be ideal, but you can use more. Your cooling platform will then be ready for you to load your serving bowls or plates.
For a useful addition, you can attach menu cards to the board’s edge using a few magnets to let guests know what each bowl contains, as well as the ingredients if you like. When you are finished, you can hang it on a wall to serve as a magnetic board and take it down again in time for the next party.
3. Ornate frame
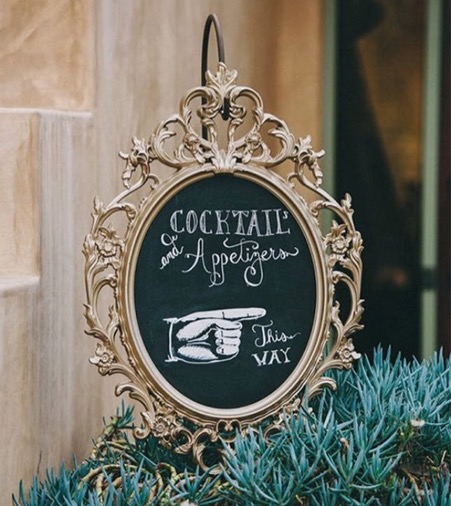
You can create a large signage or a unique photo prop with IKEA’s baroque-inspired Ung Drill Frame. Print whatever you like on chalk board paper and frame it. Another option is to line the frame with chalkboard if you would prefer a hand-written or hand-drawn message. You can also leave the frame open and let it dangle from a tree branch to allow your guests to take pictures. If you don’t like the colour and would rather opt for something personalised, you can spray paint it any colour you like. Feel like adding a rainbow of colours? Go ahead – and maybe even add some glitter to really make it sparkle.
4. Cute cushion stools
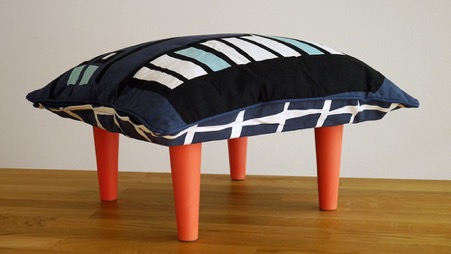
Head to Legheads.com for furniture hacks and this one will certainly catch your eye. It is a cushion stool, made using IKEA Gitte cushions and Legheads’ colourful furniture legs. They are perfect for kids to sit on when they want a break from running around and your adult guests will absolutely love them too.
For this project, you’ll need an IKEA Gitte cushion, a wood board and a set of Legheads furniture legs. The piece of wood must be smaller than the cushion if it’s going to fit right. So, if the cushion is 50cm, the wood can be cut to a 40cm square.
You can buy the wood board cheaply from a home improvement store or have a piece cut at your local hardware store. Be sure to use something that can take the weight of an adult, such as strong plywood.
Once you have your materials ready, grab the wood board and mark where you will be fitting the legs using the attachment plates, then drill pilot holes there. It is important that the drill bits you use are a bit smaller than the hangar bolt and screws.
Next, screw in the attachment plates. Then you’ll need to insert the cushion and piece of wood into the cushion cover, taking care to make the attachment plates face downward. Using a sharp implement, punch holes into the cushion cover and screw in the furniture legs. When the party is over, you can use your cushion stools as footstools or seats for the kids. For other great furniture hacks like this one, check the Legheads IKEA Hacks page.
5. Cactus planters
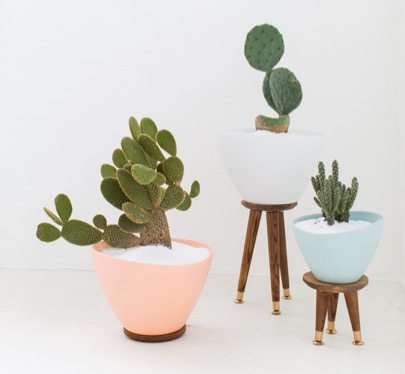
Your plants may not directly have anything to do with your party, but they can add aesthetic appeal. Most probably, very few people will have a similar cactus plant to the one you will create through this project. You can put them anywhere in your yard, where they can be seen and appreciated by all who pass.
For this project, you will need tapered furniture legs of different heights. This particular hack used wooden legs, but you can swap those for Legheads furniture legs for a dash of colour. You will also need three angle plates and 6” wooden plaques for each stand, as well as planters, foam brush, painters tape, drill and bits, wood stain in American walnut finish, and spray paint. You can also purchase large screws or glue if you would like to join the planters to the stands.
Firstly, prep the wooden plaque base and the legs (if you are using plain wood) by staining the unfinished wood using a foam brush. Once the wood is completely dry, you’ll want to tape off the stained wood section so the feet are exposed, then you can spray them with gold paint. You can skip this entire section if you are using Legshead furniture legs and prep only the plaque base.
If you like your pots as they are, you don’t have to do anything to them. However, you can spray paint them brighter colours to make them stand out if you feel the need. Take the wooden plaque and place three angled plates on the bottom in a triangular shape, screwing each one into place. You need to make sure the angles are facing outward from one another. Screw each of the legs into the plates.
If you are attaching the base and the pot, you can screw them together or use glue. Another option is to skip the legs entirely and simply attach the pot to the wood base, though it would be preferable to mix them up. Fill up your pot with cactus and whatever kind of sand you please – white certainly looks nice.
Legheads Giveaway!
If you intend to try this hack anytime soon, you’re in luck, because Legheads is currently running a product giveaway, meaning you can get some of their awesome furniture legs without paying a dime.

6. An ultra-cool ice chest
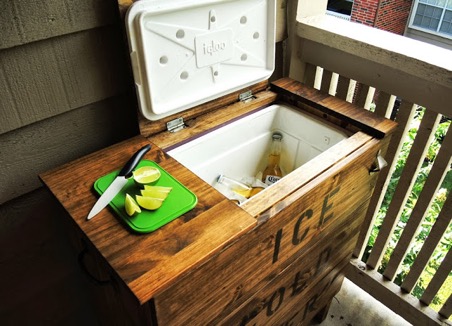
No barbecue party is complete without cold drinks for everyone. With this cool hack, you can have a cooling area for your drinks, other than a boring old cooler that your guests will love taking drinks from.
For this hack, you’ll need the TARVA 3-drawer chest. With this project, you will be creating a hatch on top of the chest that your guests will be using to grab a drink. You need a bit of extra structural support underneath it where you will also attach the top hatch hinges.
You can skip measuring out the depth where you would have to place the supporting floor, by placing everything upside down. You will be screwing the top lid of the cooler into the hatch, so be sure to consider that, as well as the additional layer of insulation you’ll be putting in. Everything has to fit nicely into the body once the whole unit is assembled.
To avoid dealing with the stress of turning the chest upside down to get rid of the melt water, be sure to build a drain in the bottom to let the water out. Most importantly, don’t forget to test it all out before proceeding to seal it up.
Add insulation to the sides, front and back, and glue the drawer fronts too. When you are done, you can apply walnut stain on the bare wood to enhance the wood texture. Then finish off with a few layers of clear stain and a bit of spray paint. Even after your barbecue party is over, you can continue to use your awesome cooler to chill your drinks when you need to cool off on the porch during those hot summer days. All your friends will want one for themselves!
7. Simple trivet tray
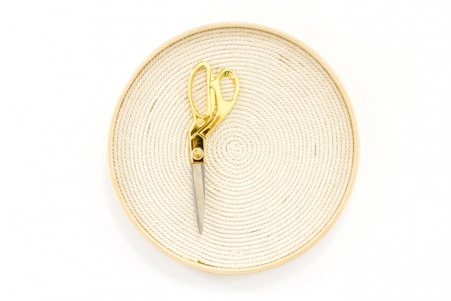
This particular hack is super simple to make and absolutely gorgeous. You’ll definitely want to use it to serve tea every day, but we recommend that you don’t serve any foods that may stain it during the party. For this project, you need an IKEA PS 2014 tray, glue, rope and scissors.
Firstly, you’ll need to make sure you have enough slack rope to work with, so start by uncurling your rope. This step will help you avoid a situation where your glue dries on you by making it easier to work at speed.
Next, you have to squeeze a circle of glue on the floor of the tray, along the edge. Once you have made a complete circle, take the rope and gently push it into place along the line you have created. Try not to lay the rope down too tightly, so as you don’t accidentally pull it out of place as you go along. Pick up the glue again and draw another circle, place the rope along the new line and continue in that fashion, applying glue and attaching rope, until you get to the middle.
To make sure the rope stays securely in place, lay a stack of books or a heavy box on top of the finished rope tray. Leave it to dry overnight. You can use darker colours of rope so you won’t have to worry as much about stains.
Conclusion
Pick one or more of these genius hacks to try for your next barbecue party and we bet your friends will be wowed. Have fun!


